
Trombone Resources For Teachers
Teaching is one of the passions of my life, so I love creating trombone exercises, worksheets, and other helpful guides for students.
Here are some that I have created. Feel free to download and save the images for your use!
How to Use Air – Brass Player Guide
This infographic visually explains the fundamental role of controlled breath in brass playing. It breaks down air management into three key components – Speed, Volume, and Constancy – relating each to musical outcomes like pitch and dynamics, and offers practical tips for improvement using simple analogies like pinwheels and balloons.

- BREATHING IS MADE UP OF THE INHALE (AIR GOING IN) AND THE EXHALE (AIR GOING OUT).
- YOUR BODY WANTS TO MATCH THE EXHALE TO THE INHALE.
- BREATHE IN THE WAY YOU WANT TO BLOW.
WAYS TO CONTROL AIR
SPEED
- FAST AIR IS FOR HIGHER NOTES.
- SLOW AIR IS FOR LOWER NOTES.
- TIP: EXPERIMENT WITH CHANGING SPEED BY USING A PINWHEEL.
VOLUME
- THE VOLUME OR AMOUNT OF AIR CHANGES THE DYNAMIC.
- MORE AIR MAKES LOUDER NOTES.
- LESS AIR MAKES SOFTER NOTES.
- TIP: EXPLORE YOUR LUNG CAPACITY BY SEEING HOW BIG YOU CAN BLOW UP A BALLOON WITH ONE BREATH.
CONSTANCY
- THE MORE CONSTANT YOUR AIR, THE BETTER YOUR SOUND AND SLURS.
- TIP: HOLD A PIECE OF PAPER IN FRONT OF YOUR MOUTH AND BLOW IT AWAY. SEE HOW LONG YOU CAN KEEP IT STEADY. MOVE IT FARTHER AWAY AND TRY AGAIN.
THE PIZZA METHOD OF LEARNING MUSIC
This graphic uses a relatable pizza analogy to break down the core components of music for learners. It compares Rhythm to the crust, Harmony to the sauce, Melody to the cheese, and Dynamics/Articulation to toppings, suggesting a systematic order for learning a new piece by tackling these elements individually before combining them into the “whole pizza” or piece.

- CRUST = RHYTHM
- SAUCE = HARMONY
- CHEESE = MELODY
- PIZZA = WHOLE PIECE
RHYTHM
Foundation That Holds the Music Together – Learn the Rhythm of Your Music First.
- Identify the time signature.
- Scan the part and find all of the rests and potentially tricky rhythms.
- Identify any repeats or other changes to the road map.
- Count out the beats in each measure while you clap the rhythms you play.
- a. Try switching the Singing and Clapping
HARMONY
Turns the Rhythm into Music.
SIMPLE SONG
- Identify all of the notes in the piece and the scale they create. Example: C D E F G A Bb
- Finger those notes on your instrument to review and then play the scale.
FOR BAND MUSIC: (SOLO WITH PIANO – You will also have supporting parts where the piano has the melody. Same steps)
- Find the part of the music where you have the harmony.
- Find where you are playing a supporting part and mark your music so you remember to leave room for the melody.
- a. Extra credit: Listen for the instrument who has the melody and write their name in the music.
MELODY
So Good You Like It Alone. The Melody is the Part You Sing.
- Put together the notes from your scale and the rhythm you already learned at a slow tempo.
- a. I call this the tempo of learning: Tempo di Learno!
- Find repeated music and other simple music like scales and half or whole notes.
- a. Work on the music that is left by itself
- Sing any part that gives you trouble while you also move your fingers.
CHEESE IS GOOD, BUT WE NEED DELUXE!
TOPPINGS = DYNAMICS & ARTICULATION
The Special Flavor That Makes the Performance Great.
- Identify every dynamic marking in your music. If there isn’t any, then add some!
- Identify articulation markings like accents and slurs. Bring them out by displaying a distinct difference.
- When there is one consistent type of articulation, work to make it as clean and consistent as possible.
- Try playing a phrase on a single pitch so that you can clarify the kind of articulation shape you want.
- a. Add back one pitch at a time. Only add another pitch when you can play the whole phrase cleanly with the notes you have.
THREE STEPS TO BRASS PLAYING
This simple infographic outlines the fundamental process of sound production on a brass instrument. It presents the core sequence: using Air to create a Buzz with the lips on the mouthpiece, which is then amplified by the instrument to create Sound, providing a basic conceptual framework especially useful for beginners.

AIR -> MAKES -> BUZZ -> MAKES -> SOUND
1 AIR
The first step to playing any brass instrument is to get your air moving. Always start by breathing out. Being empty will cause your body to want to fill up with air and let you take a healthy breath without straining.
2 BUZZ
All sound is created by vibrations. Buzzing is the vibration of air passing over our lips. We want to control this vibration as well as we control our vocal chords. Sing a note and then match that note on the mouthpiece to work on mastering this skill.
3 SOUND
When the buzz we create on the mouthpiece is added to the instrument, it is amplified and creates our sound. Listen to as many top players on your instrument as possible in order to learn what a great sound is. You need to know what good sounds like in order to know how to get there.
BEGINNER PRACTICE FLOWCHART
This flowchart provides a structured, problem-solving approach for musicians encountering difficult passages. It guides users through identifying problem areas, breaking down the music to simplify it, checking comprehension (like singing), rebuilding towards the original complexity, changing the range if needed, and using analytical techniques like the “Five Whys” to find root causes, offering strategies beyond simple repetition.
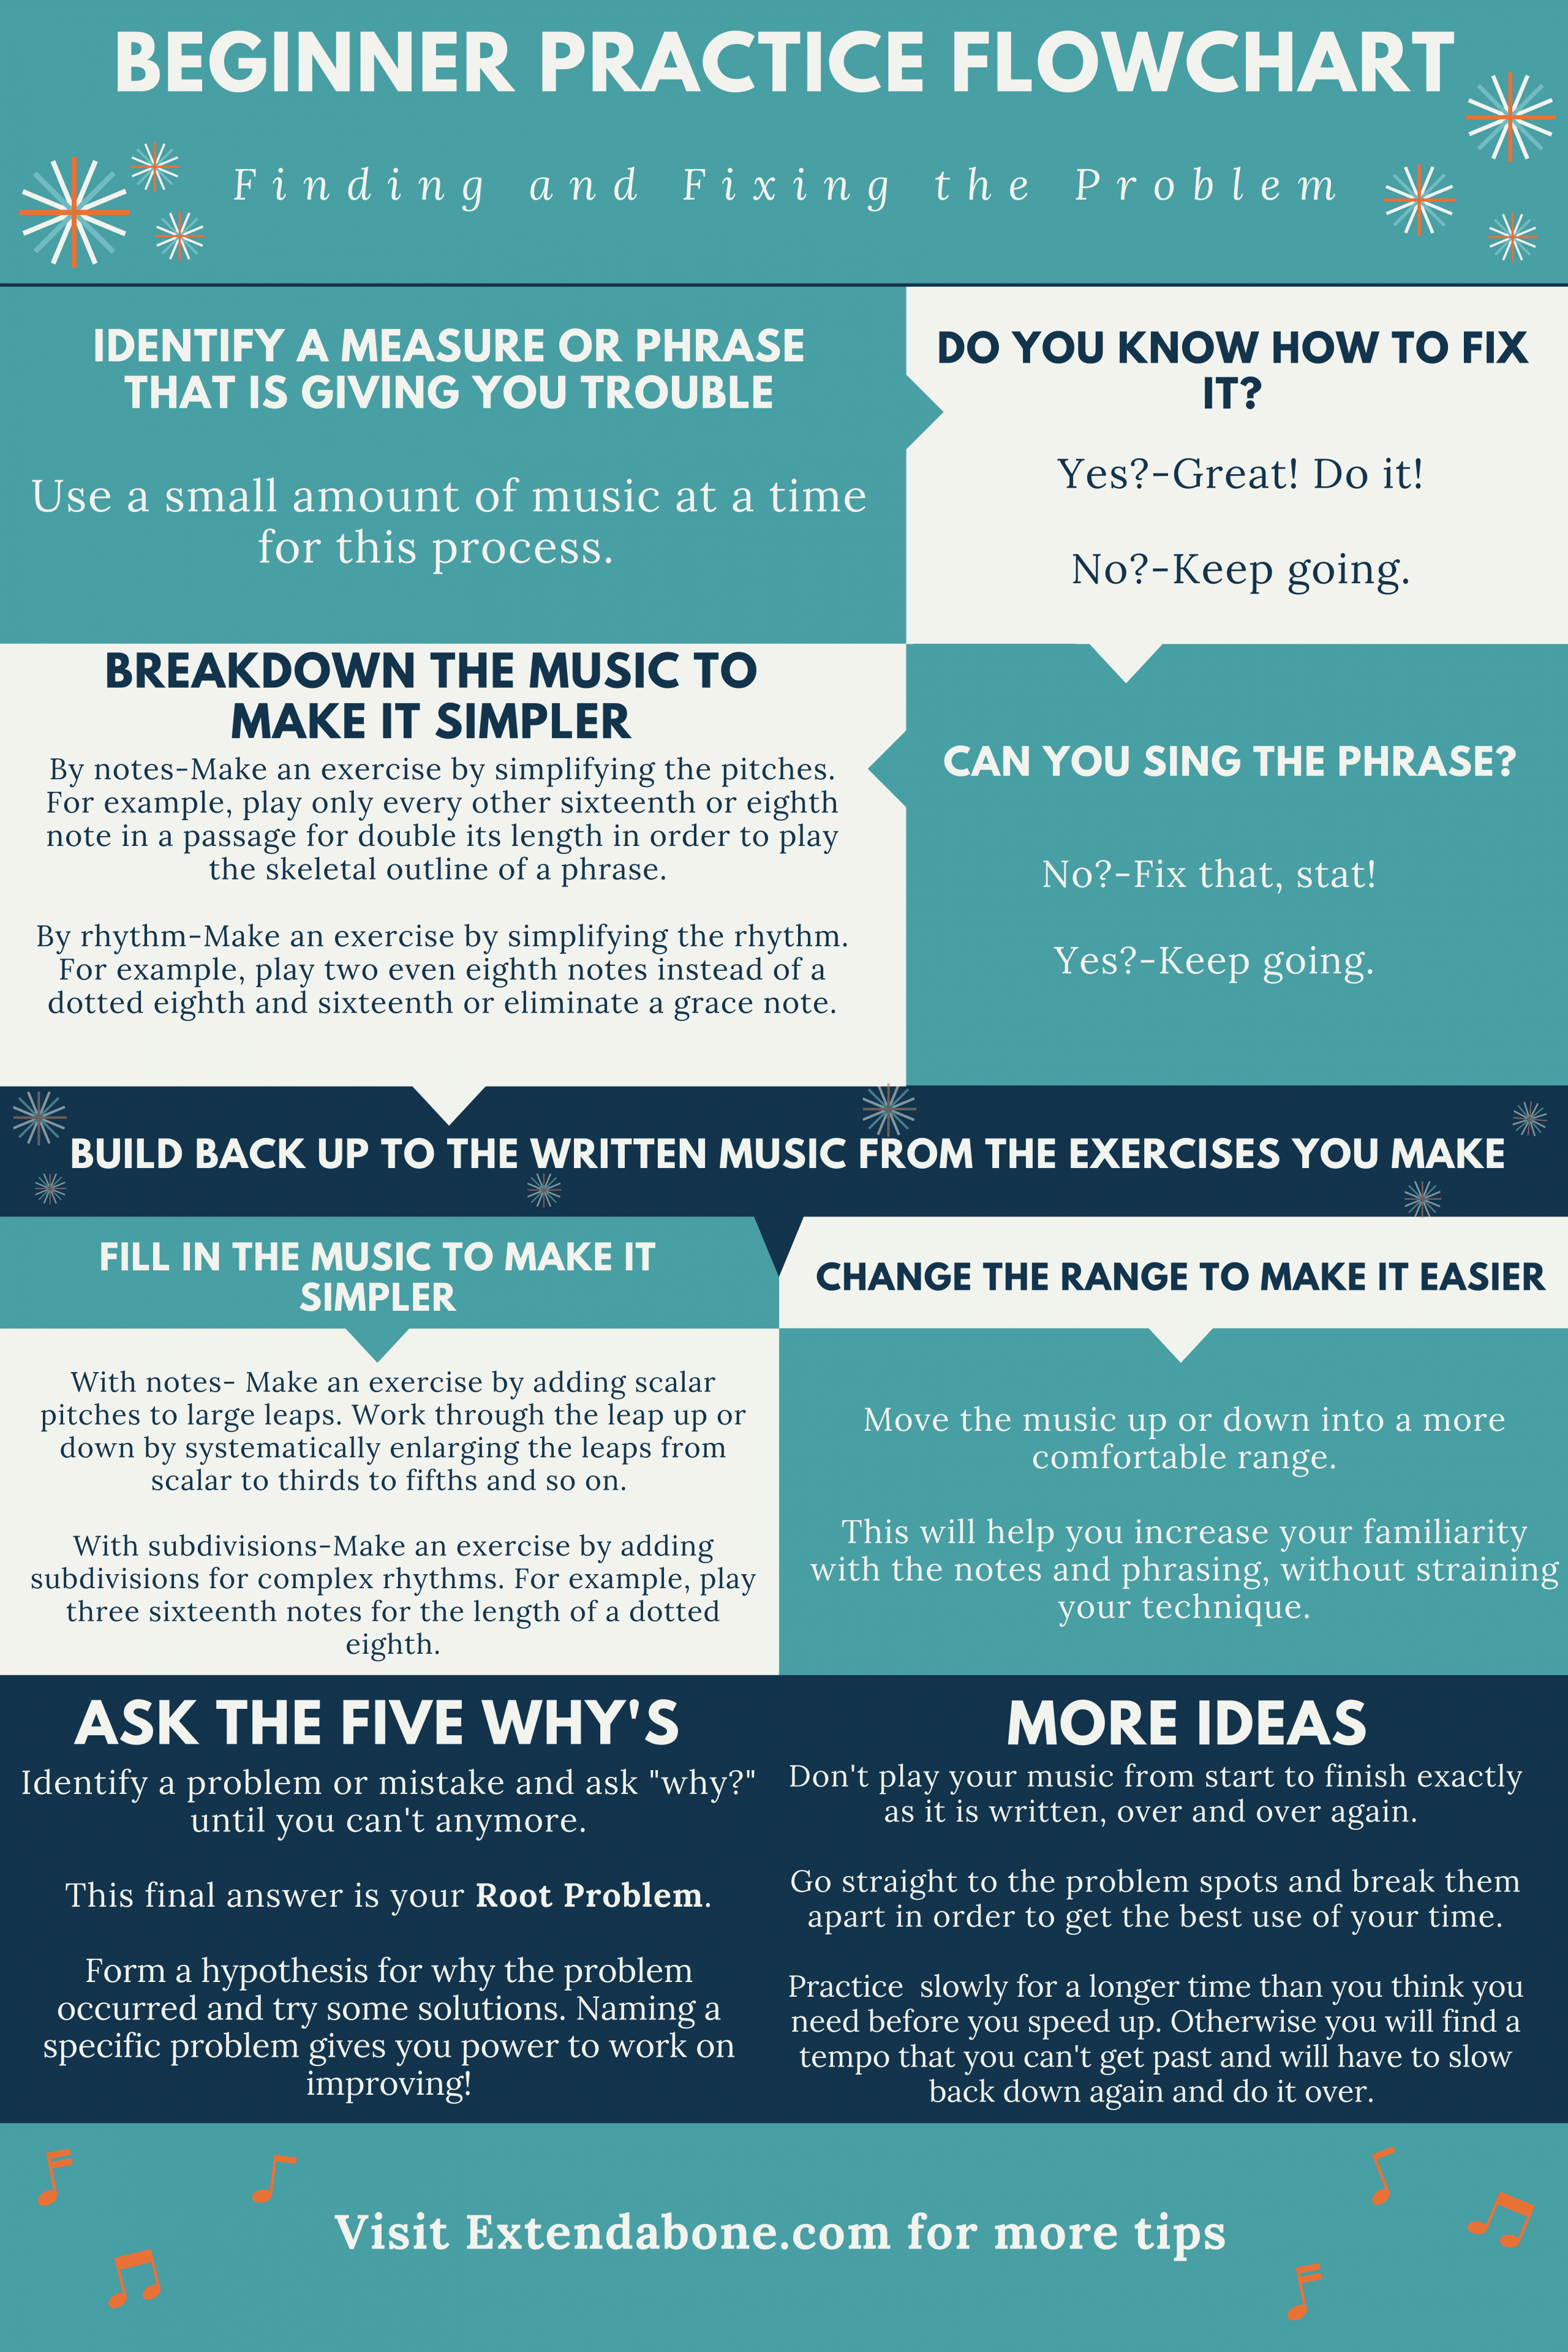
Finding and Fixing the Problem
IDENTIFY A MEASURE OR PHRASE THAT IS GIVING YOU TROUBLE
Use a small amount of music at a time for this process.
DO YOU KNOW HOW TO FIX IT?
Yes?-Great! Do it!
No?-Keep going.
BREAKDOWN THE MUSIC TO MAKE IT SIMPLER
By notes-Make an exercise by simplifying the pitches. For example, play only every other sixteenth or eighth note in a passage for double its length in order to play the skeletal outline of a phrase.
By rhythm-Make an exercise by simplifying the rhythm. For example, play two even eighth notes instead of a dotted eighth and sixteenth or eliminate a grace note.
CAN YOU SING THE PHRASE?
No?-Fix that, stat!
Yes?-Keep going.
BUILD BACK UP TO THE WRITTEN MUSIC FROM THE EXERCISES YOU MAKE
FILL IN THE MUSIC TO MAKE IT SIMPLER
With notes- Make an exercise by adding scalar pitches to large leaps. Work through the leap up or down by systematically enlarging the leaps from scalar to thirds to fifths and so on.
With subdivisions-Make an exercise by adding subdivisions for complex rhythms. For example, play three sixteenth notes for the length of a dotted eighth.
CHANGE THE RANGE TO MAKE IT EASIER
Move the music up or down into a more comfortable range.
This will help you increase your familiarity with the notes and phrasing, without straining your technique.
ASK THE FIVE WHY’S
Identify a problem or mistake and ask “why?” until you can’t anymore.
This final answer is your Root Problem.
Form a hypothesis for why the problem occurred and try some solutions. Naming a specific problem gives you power to work on improving!
MORE IDEAS
Don’t play your music from start to finish exactly as it is written, over and over again.
Go straight to the problem spots and break them apart in order to get the best use of your time.
Practice slowly for a longer time than you think you need before you speed up. Otherwise you will find a tempo that you can’t get past and will have to slow back down again and do it over.
SMART GOAL WORKSHEET

This image presents a “SMART Goal Worksheet”. It’s a visual tool designed to guide individuals through the process of setting effective goals using the well-established SMART criteria. SMART is an acronym that stands for:
- Specific
- Measurable
- Achievable
- Realistic
- Time-bound
The worksheet breaks down each component of the SMART framework into a distinct section. For “Specific,” “Measurable,” and “Time-bound,” it poses a direct question and provides a space for the user to write their answer. For “Achievable” and “Realistic,” it presents a yes/no question, guiding the music learner to either continue (“Keep Going”) or reconsider their goal (“Start Over” or “Make Adjustments”) based on their answer.
This format helps ensure that the goal being set is well-defined, trackable, and actually possible to accomplish within a set timeframe.
SIGHT-READING FLOWCHART
This SIGHT-READING FLOWCHART serves as a strategic guide for musicians tackling the challenge of sight-reading, which is the skill of playing a piece of music correctly upon first seeing it. The flowchart is organized into several sections, offering a step-by-step process and key areas of focus.
It starts with foundational checks (clef, key/time signatures), moves to coordinating physical playing with mental understanding, addresses strategies for handling difficult passages and repeats, and concludes with general advice and reinforcing tips.

Learn it Right the First Time
START AT THE TOP LEFT AND WORK FROM THERE
What is the clef? Notice any extreme notes and mark them.
What is the key signature? Mark any notes you might easily miss with an accidental.
KEEP MOVING RIGHT
What is the time signature? Are there any tricky to read passages?
Mark anything you can with slashes so you can see the beats more easily.
WIGGLE THOSE FINGERS
Now sing and move your fingers to press down the right key or string in rhythm so that you can work on the coordination alone.
BE THE CONDUCTOR
Sing and conduct through any rhythmically challenging passages. Watch where the rhythms fall within the beat and in the measure to help you understand what’s going on.
SEARCH OUT THE HARD PARTS AND REPEAT THIS PROCESS
FIND ANY REPEATS
Take the time to notice when music repeats or only has a slight change. Very often you only have a small amount of completely new material and the rest is based on something you already played.
Isolate and work on any repeating patterns to make them more confident.
Mark any places where earlier music has been slightly changed, so you don’t fall into a trap.
Circle key changes and put in new accidentals.
YOU KNOW ALL THE ANSWERS
Whenever a new pitch or rhythm is put in front of us, we can panic. Instead, start from the information you do know, and work out the answer for yourself.
Deductive reasoning can usually lead to a clear answer when a new symbol or note is found in our music.
When the panic is more technique related, slow down the passage in your mind. Mark each beat with a slash and watch each beat as you play it. The music is not as fast as we think it is when we are scared.
MORE IDEAS
Don’t rush into playing music before you have looked at the details or you will risk making silly mistakes and have to unlearn them.
Look at dynamic markings throughout the piece. You don’t want to miss any sudden changes.
Instead, take the time to look over the details and write in anything that will help you.
Look over any tricky things and play them in your mind before you try on your instrument. The best olympic athletes use mental practice, so can you!
Get More Music and Trombone Resources
More PDF Downloads can be found Here on my Teachers Pay Teachers Store.
Poster Prints can be found Here in the Extendabone Store.
Please feel free to reach out and let me know what you and your students think!